HDR Effect w/o SLR Camera
Choose Your Image
When choosing a starter image, you are going to want to be sure that its a picture that has the potential to really stand out when using the HDR effect. Most of the time, photos of people or pets will only end up looking washed out - so buildings, landscapes and other inanimate objects usually work best when applying this effect. But who am I to tell you what you can try it on? Don't let some random guy from the internet tell you what to choose - after learning the method I'm about to show you, try it on many different types of photos and see what works best for you.Getting Started
Open up the ol' photoshop along with your starter image, and we shall begin. Keep in mind that everything I say from this point forward is simply what I do to achieve this effect, and can be experimented upon and adjusted to fit your own personal style and what you enjoy for a final result better suited for what looks good for you. I'm just taking you along the path, feel free to deviate from it if you like. Always remember to save a backup copy of the original, just in case. Safety first.
Step 1
The first thing we're going to need to do is setup some layers. With your layer window open and ready - create four separate layers.
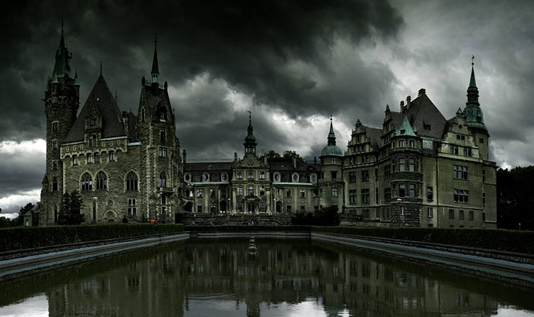
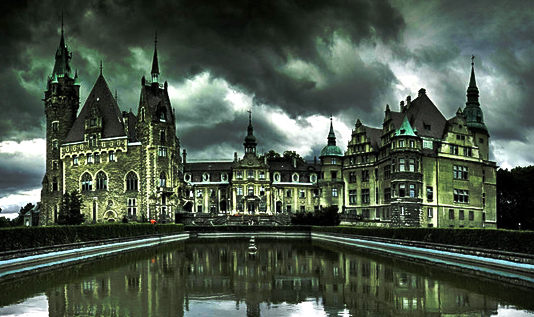
Alright, here is our starter image. I chose a darkened castle scene (its usually best not to choose a picture that is too dark to begin with due to artifacting that occurs when brightening it in a later step, but I wanted to choose a photo that best showed results - more on that later) and I think you'll agree that it already looks like a dream of sorts before we even work on it. Who doesn't love castles?
Being that this is a medium level tutorial, I'll assume that you know where each option is located, and will only list in my text the commands that you need to use. For beginner level tutorials I will be mapping out all moves in the menus with photos, but I think mid level folks know their way around fine enough.
1a. Select the "Image" command from your top menu and proceed to "Image Adjustment" and finally to "Shadow/Highlight".
1b. In the menu that pops up there, be sure to tick the "Show More Options" box if it is not already selected. Then slide the bar or enter numerical values for the following:
- Shadow Amount: 50%
- Tonal Width: 45%
- Radius: 44px
- Highlight Amount: 65%
- Tonal Width: 65%
- Radius: 46px
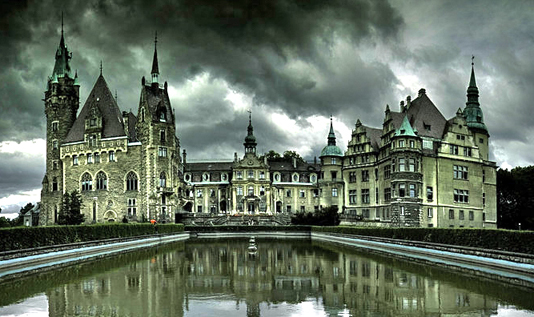
If done correctly, your photo should look something like this:

Step Two
- Alright, now we've got the first (and most important) step out of the way by setting the shadow/highlight values. Next comes our second layer.
- 2a. With your "Layers" menu visible, right click on your first (and base) layer and choose "Duplicate Layer". We'll name this new layer "Color Dodge" to emphasize the effect we'll put on the layer to make things less confusing later on.
- 2b. Right click on this newly created layer and choose "Blending Options". You'll want to set this layer to "Color Dodge" using the dropdown menu of options. This will give the photo the strong colors we need, and will fill very bright areas with pure white in most cases. If this happens, don't fret - we will fix it in the next step.
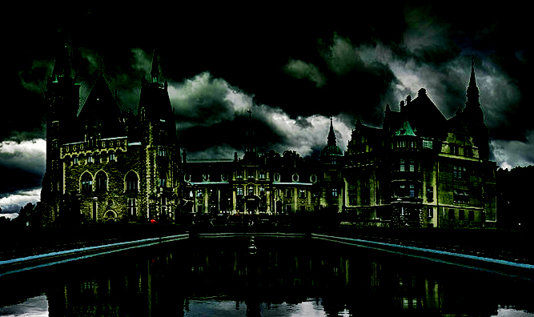
Alright: Our photo should be looking something like this:
Step 3
During this step, we'll basically be repeating step two but with a different result.
3a. Right click on the base layer you began with again - but this time choose "Linear Burn" as the name. Right click on this new layer and choose "Blending Options" - setting it this time to.. you guessed it! "Linear Burn". Don't be alarmed when the entire photo turns much darker, we will adjust this result soon enough.
Step Four
This step is very easy.
4a. Right click on the "Linear Burn" layer we just created for the last step and duplicate it. Name this one "Overlay". Right click on it again and choose "Blending Options", and then "Overlay". As you are probably understanding by this point, we're getting this effect by manipulating many layers and blending them all together. Clever, eh?
By about now we should be looking like this:
Step 5
Now its time to adjust a few of the layers to get the final blend of what we want to see.
5a. When you have a layer selected, you should see at the top of the "Layers" menu "Opacity". Changing this value will raise or lower transparency and will blend our image together. I found the following works best:
- Base Layer: 100%
- Color Dodge: 100%
- Linear Burn: 10%
- Overlay: 100%
In some cases the setup would benefit more from a 45% 'Overlay' layer and 55% - 60% for the 'Linear Burn' layer. Depending on the photo - this is one area where you need to experiment and find what works best for the blend to get maximum eye popping results.
We've now reached what we'll assume is our final result:
Step Six
Artifacting may occur at some point while working with jpeg format instead of raw - not alot we can do if the picture did not choose to work with us that well during the course of this tutorial. Using a photoshop filter such as "Neat Image" or even using light amounts of blur may help clean it up - but this is one of the perils of "Faking It" so to speak.
I hope you enjoyed this tutorial and the result you ended up with. Try this on many photos and see what you come up with. Enjoy!
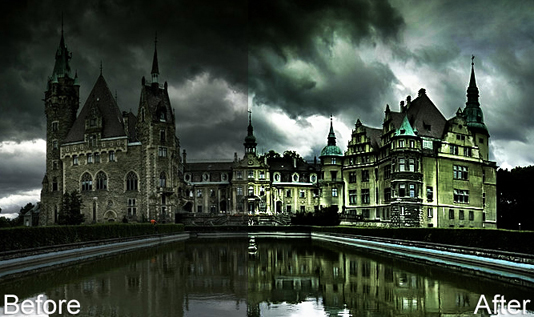
One final image for comparison: